Blog Freebies

Thursday, December 19, 2013

Christmas Plates: Gift Idea For The Grandparents

We came up with a great and easy idea for gift giving and we want to share it with all of you. It's something the kiddos can do and make by themselves with minimal help. I found some ceramic plates at the thrift store and it got me to thinking. Why not make these into gifts! So we made this super simple and easy craft and the girls loved it. 

CHRISTMAS PLATES USING SHARPIE MARKERS


CHRISTMAS PLATE SUPPLY LIST

1. White ceramic plates from the thrift store or you can buy new
2. Set of Sharpie markers - fine point 
3. Oven

We began this craft by first making sure the plates were clean. Next we got out our set of Sharpie fine point markers and went to work creating. The girls chose to draw on their plates, but I decided to put a Bible verse on mine. After we were finished we put the plates on a cookie sheet and put them in a 250 degree oven for about thirty minutes to set the marker. We then turned the oven off and let the plates cool in the oven. Ta Da, an easy peasy Christmas gift with a personal touch and frugal to boot!

I'm sure you could decorate white cups the same way if you would rather go that route. The baking in the oven is suppose to set the marker so they can be washed. Suppose to, but I will admit we haven't washed ours so I can't attest to whether or not that is fact.     


                                                   Have fun and Happy Crafting!

Monday, December 16, 2013

Giant Stained Glass Sugar Cookies For Christmas


GIANT STAINED GLASS SUGAR COOKIES

Yesterday was baking day! I tackled a project I had had in mind to do with the girls for awhile. We made giant stained glass sugar cookies. I found a new sugar cookie recipe that doesn't need to be chilled and it is so YUMMY! It's going to be my new, all time favorite sugar cookie recipe!  We had so much fun making and baking these. We will definitely be making these again. 


 Supplies you will need besides the baking supplies and cookie pans and of course the rolling pin are miniature cookie cutters. I also had a cookie cutter with a removable round center piece that I used for the round shapes. To make the giant cookies I used the lid from a large container of baking powder that I bought at Sam's Club. Probably any extra large lid 5 or 6 inches across would work. Also make sure to bake these on a cookie sheet covered with parchment paper so they will be easy to remove.

BEST SUGAR COOKIE RECIPE EVER!
 credit given to Katrina's Kitchen for this wonderful recipe
Yield: 3 dozen large cookies
Prep Time: 30 minutes
Cook Time: 6-8 minutes
Total Time: 38 minutes

Soft cut out sugar cookie recipe that keeps its shape and dough does not need to be chilled before baking- perfect edges every time!

Ingredients:

  • 2 cups of butter, softened
  • 2 cups of granulated white sugar
  • 2 teaspoons of vanilla extract
  • 1 teaspoon of almond extract
  • 2 eggs
  • 4 teaspoons baking powder
  • 6 cups all purpose flour

Directions:

  1. Preheat oven to 350° F.
  2. In the bowl of your mixer cream butter and sugar until smooth.
  3. Beat in extracts and eggs.
  4. In a separate bowl combine baking powder with flour and add a little at a time to the wet ingredients. The dough will be very stiff. If it becomes too stiff for your mixer turn out the dough onto a countertop surface. Wet your hands and finish off kneading the dough by hand.
  5. DO NOT CHILL THE DOUGH. Divide into workable batches, roll out onto a floured surface and cut. You want these cookies to be on the thicker side (closer to 1/4 inch rather than 1/8).
  6. Bake at 350 for 6-8 minutes. Let cool on the cookie sheet until firm enough to transfer to a cooling rack.

Notes:

  • If you must chill the dough just leave it on the countertop for 10 minutes before rolling or work the dough with your hands for a few minutes.
  • I hesitate to put a recipe yield on cut out cookie recipes because the yield varies with the size of cookie cutters being used. This recipe makes a LARGE amount of dough. It can easily be halved to meet your needs.
  • You can omit the almond extract if you do not have it available, however the taste is really fantastic with the hint of almond.

I do want to point out that when you make these it is very important they not be too thin. The dough also needs to have nice clean cut edges so the candy doesn't wick up into the cookie as it melts.  These giant cookies are approximately 5 inches across and at least 1/4 inch thick. Also this is very important. When you make these bake the cookies for 6-7 minutes, then remove them from the oven and add the crushed candy to the cutouts, then return to the oven and bake for another 6-7 minutes or so more. Otherwise the candy melts too much and will either burn or run everywhere. Trust me I know from experience! Also it's hard to tell when the cookies are done. Don't wait too long or they will be too done!  Total baking time for us per pan of cookies was about 12 minutes, but that may vary for you depending on your oven. Also this recipe makes at least a dozen giant cookies. We also baked the cutouts and they made nice size cookies even though we used miniature cookie cutters for the cutouts.


Have fun and enjoy baking and creating with your little ones and older ones too!


Sunday, December 15, 2013

WATERLESS SNOWGLOBES. A FRUGAL AND VERSATILE CHRISTMAS CRAFT


WATERLESS SNOWGLOBES


I have another fun Christmas craft for you today. Waterless snowglobes! They were so fun to make and the girls had so much fun helping me. The girls loved the little trees and how they looked in the jars. For this craft I went around the house picking and choosing from jars I already had. I also picked up a few more jars from  the thrift store in town. Then the girls and I added fake flaked snow and trees or snowmen or other Christmasy type things.

This craft can be used all winter and for other holidays. All you need to do after you make these is change out the scenes if you want. I plan on using them  for New Years and Valentines Day. I'm lovin this craft already. All that's left now after I've decided how I want these waterless snowglobes arranged is to put my Christmas tablecloth on the table and make my tablescape. Kind of think I want a different look that the world map that is on our dining room table right now. Ha, Ha, imagine a homeschool mom having a world map on the table!


WATERLESS SNOWGLOBE SUPPLY LIST

1. Ice Flakes or Sparkle Flakes from Walmart
2. Jars of various sizes and shapes including lids
3. Small figurines and bottle brush trees to put in the jars
4. Hot glue gun and hot glue sticks 

We started this craft the night before by washing the jars and letting them completely dry inside.  The girls and I then chose what we were going to put in the jars. We were careful not to get our fingerprints all over the glass. I helped the girls shake just enough of the sparkle flakes or ice flakes into each jar to cover the bottom well. We shook the flaked snow into the apothecary jars and placed our figurines or the nativity on top of the snow and then placed the lid on top. The salt shaker and canning jars we hot glued the figurines to the lid first. Then we shook snow into the jar and placed the lid with the figurines attached on the jar and screwed the lid on. We didn't glue the lid on. That way we can reuse the jars for other scenes later. Once you have you snowglobes made you can display them as a beautiful Christmas tablescape. The girls and I are thrilled with how ours turned out. 

                                                    Have fun and Happy Crafting!

Saturday, December 14, 2013

Cinnamon Stick Trees. An Easy Christmas Craft


We are on a crafting craze around here these days. The girls and I have been at it again, this time making cinnamon stick trees. If you are looking for a quick craft this is it. No glitter this time! We happened to have everything on hand that we needed for this craft, but if you don't the items needed are easy to find.  This craft was super simple, fast and easy and the girls loved how they turned out. I think they are extra cute too! Notice the little ladybug climbing up the trunk of one of the trees? That was McLarin's special touch! She insisted there had to be a ladybug on hers.


CINNAMON STICK TREES SUPPLY LIST


1. Old Pine Garland
2. Long Cinnamon Sticks
3. Hot Glue and Hot Glue Gun
4. Thread For Hanging- if you want to make these as ornaments
5. Embellishments- such as buttons, snowflakes, small beads, gingerbreadmen etc
6. Gold Star For The Top Of Tree
7. Snow-Tex- for texturing the trunk of your trees
8. Scissors


Before you begin this craft take the pine garland and cut three to five pieces for each tree. I began with a cut piece about 3" and graduated the size of the pieces so each piece was a little smaller. The garland is a little hard to cut so you will need some sturdy scissors. Once I had the garland cut the girls then began gluing pieces of the cut garland to the cinnamon stick. Make sure your little crafters leave enough cinnamon stick at the bottom for the tree trunk. Little ones will need help with using the hot glue gun.

Once the garland pieces are glued on embellishments can be added as you like. After adding embellishments the girls added a gold star to the top of their trees. To add a little whimsey we added some snow-tex to the trunk of each tree. I bought the jar we have at Hobby Lobby several years back. Last of all was gluing on the gold string to the back of the tree to make a hanger. Start to finish this craft probably took us 30-45 minutes max.  Super simple,  hardly any mess and so cute. Have fun crafting with your kiddos! 


Thursday, December 12, 2013

Melted Snowmen. A Fun Craft For The Holidays


MELTED SNOWMEN!

 We made the cutest, easiest and fun craft tonight. Melted snowmen! They were so easy to do and they didn't take long at all. Little ones will need help because this craft makes us of a glue gun and glue sticks. The girls has so much fun creating their own version of a melted snowman that we wanted to make sure and share it with you. We will definitely be doing this craft again!


MELTED SNOWMEN SUPPLY LIST

1. Aluminum foil
2. Hot Glue Gun
3. Glue Sticks
4. White Glitter
5. Black Buttons - two different sizes
6. Tooth Picks
7. Orange Magic Marker
8. Pieces Of Cloth -for snowman's scarf
9. Piece of Wire - or something to use as a hanger 
10. Embellishments - if you want. We used really small artificial snowflakes 

I started by giving each of my girls a piece of aluminum foil. This is what they squeezed the hot glue onto. Before we began I broke off the tip of a couple of toothpicks and colored them orange. These were used for the Melted Snowmen noses. I also cut a piece of cloth or felt for the scarves and clipped the ends to make them look like they had fringe. Once they had the glue squeezed onto the foil and their melted snowman was in the shape they liked they placed buttons on for the snowmen's eyes and mouth. 
One of my daughters wanted to use googly eyes. It gave her melted snowman a surprised look and made it uniquely her own! They also arranged the tip of the toothpick I had colored orange with the magic marker before we started. Once the face was on the girls sprinkled the white glitter into the melted snowmen while the glue was still warm enough for it to stick. Next they placed the fabric scarf on the bottom of their melted snowman and placed the hanger in the top, making sure it was secure. The last thing the girls did was to add embellishments to their melted snowmen. They chose to use very small artificial snowflakes. Some were white and some were clear.


A FEW THINGS THAT WE FOUND THAT HELPED
 
A few things we discovered that helped was to squirt the hot glue in a back and forth motion. That way it doesn't end up in a big wavy lump. You can also use the tip of the hot glue gun to smooth out any ridges when you are making the melted snowmen.

It's also a good idea to work fast so the buttons and other snowman parts will adhere well. Otherwise the glue will begin to harden and you'll find like we did your buttons or embellishments will fall off and have to be reglued.

For the hanger I had some tiny candycanes made from wire that we used. They made the perfect hangers. Once your melted snowmen have been created you'll want to peel the aluminum foil off the back. That is easier said than done! We found it makes the job a lot easier if you place the melted snowmen in the freezer for a few minutes. Also using heavier duty aluminum foil helps. The thinner foil tears too easily.

                    Hope you have fun and enjoy making your own melted snowmen!

Wednesday, December 11, 2013

CHRISTMAS FREEWRITING FREEBIE

FREEBIE ALERT! Free writing resource brought to you by Homeschool Adventure Co.  If you are like me any help with writing is a blessing. Sometimes I get a bit writing fatigued, and that's one reason why  I am so excited to try this wonderful tool out. I'm sure you'll enjoy it and it's FREE!


Writing can be hard work. Good writing most often results from much rewriting, and much rewriting can make a writer weary. 


Glitter Glue Ornaments Christmas Craft

 
Some of our glitter glue ornaments from start to finish, after they dried and were peeled off of the waxed paper.


Yesterday I suddenly thought to myself we need to make another Christmas craft, how about glitter glue ornaments? Then I pondered, can those even be made? I am happy to report, yes, YES they can! Now I'm sure some of you are beginning to shake your heads in dismay and ask what is she thinking, GLITTER GLUE, No Way! Let me assure you this is an easy, peasy craft with minimal mess........as long as you stick to using  JUST glitter glue. No one glued their heads to the table while doing this craft. Although I have to admit my kitchen table looks like Tinkerbelle dusted it with fairy dust. The only bit of mess was when we used loose glitter. HORRORS! Yes, I use actual to goodness old fashioned glitter at times with my kids while crafting. If you have an aversion to your table looking like is has been dusted with pixie dust, then just use silver glitter glue instead or any other color you want for your snowflakes or other shapes.

 Okay on to the craft we did. First I warned them about the glue and not to be reaching across their waxed paper for anything, but to ask for it to be passed to them. Why? Because I didn't want them glued to the table! Or glue on their clothes. I gathered all the bottles of glitter glue I could find. Too bad for a Christmas craft I couldn't find our red glitter glue bottle and apparently we are out of silver, green and gold. Hence the reason I grabbed a shaker of our white glitter and a regular bottle of white glue.

I spread out waxed paper for the girls and then we used cookie cutters to trace Christmas shapes around using magic markers. Our snowflakes were done free hand. We tried pencil and ink pen while tracing, but we found a magic marker works best. Then the girls just followed the lines with the glitter glue and filled them in as they liked. The snowflakes were done free hand with white glue and then white glitter was shaken onto the top of each snowflake. After they are dry you can carefully peel them off of the waxed paper. If your ornaments stick a little you can slightly wet the back of the waxed paper with a damp paper towel.


Some things we discovered while making these that I want to share with you are the following.

1. Make sure you make thick lines while tracing. Especially if your ornament is going to have a lacey effect.
2. Making a thicker border will make it more substantial and not so flimsy. 
3. Thinner ornaments like the snowflakes take way less time to dry, but still a significant amount of time is needed for them to completely dry.
4.  Snowflakes are delicate if they are made too thin. Don't be afraid to make them thick. 
5. This is a simple easy craft, but don't be in a hurry as it's not fast to finish. 
6. Thinner ornaments take about 12 hrs drying time. 
7. Thicker ornaments I have no idea as we are still waiting 18 hrs later for them to dry completely. I'm guessing at least 24 hrs.

                           Have fun and enjoy making your own special Glitter Glue Ornaments!


Tuesday, December 10, 2013

Christmas Cookie Baking FLOP!

This year will go down in our memory banks as the year of the crummy Christmas cookies! Talk about horrible! They were awful tasting and to coin one of my own phrases, they were gag-awful. I wanted to do a lot of different things with the girls this December and cookie baking was on the list. So while grocery shopping at Aldi's, the other day I spied some pre-made Christmas cookie dough on sale. I thought what the hay, most things I buy at Aldi's is good, so we'll try these. I bought two cans of the cookie dough mind you.  I figured I would save time by buying pre-made Christmas cookie dough.

A few days passed and yesterday I told the girls we would make cookies in the afternoon if they got the kitchen cleaned up. Once the kitchen was all tidy, or as tidy as it could be gotten by the two girls living here, we got out the cans of pre-made Christmas cookie dough. Oh we were going to have fun and make memories. Well we made memories all right!

We sliced the cookies and put them on cookie sheets and slid the cookie sheets into the oven, then we waited. In no time we had cookies! Everyone couldn't wait to taste them and I was thinking to myself, Way to go self! I had checked off from my list another item I wanted to do with the girls this year. It was so easy and simple. I was almost ready to give myself a big pat on the back........then I tried one of those cookies. I thought I would gag. They were awful. I even said to the girls These are awful! My thirteen year old burst out laughing and said, I KNOW! My five year old only ate a cookie and I'm not sure she finished it. The redemption of these awful Christmas cookies was only in the fact that the dogs loved them! They must taste like something dogs like or maybe it's just that dogs will eat almost anything, but these dogs finished off the plate of cookies with an eagerness that was a sight to behold. Put your fears to rest lest you think the dogs might have been harmed. They are fine and healthy and robust as ever this morning.

The thirteen year old thought it would be funny to put some cookies  in the cookie jar for when their dad got home and watch for his reaction when he bit into one. Ha Ha Ha, I didn't allow them to do that, but I did sort of snicker at the thought. Wicked sense of humor I guess and these girls have inherited it. Oh and if you think the fun stopped after we baked and then sampled these awful cookies then think again. Apparently something had ran over in the oven from a few days before and the oven smoked so bad you'd have thought we were on fire here! We were gagging and even as frigid as the weather is outside we had the doors open and fans on full blast to try and clear the smoke.

Oh yes, we made memories. Just not the warm memories I had envisioned in my head of baking Christmas cookies. I've learned my lesson and I won't be so quick to take shortcuts or pat myself on the back from here on out. Take it from me and save yourself some money and the horror of baking cookies like these, and make your Christmas cookies from scratch!


The worst Christmas cookies ever! lol

Saturday, December 7, 2013

Stained Glass Christmas Crafts From Salt Dough

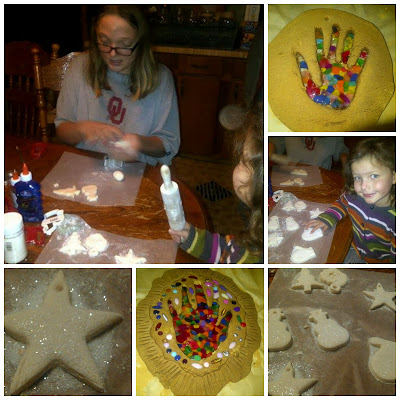
The girls and I have been busy creating lots of fun crafts this week. One of their favorites has been the stained glass suncatchers and salt dough ornaments we made. They were so simple and fun to make. The girls have gotten lots of compliments on them. The recipe is very easy, but I can mess up easy! I used an extra cup of salt, but they turned out anyway. Thank goodness.

SALT DOUGH RECIPE

2 Cups flour
1 Cup salt
1 Cup water

Mix ingredients well and knead dough until smooth. Divide into three equal amounts and roll into a ball. Turn dough out onto waxed paper and roll out to about half inch thickness. Have child place their hand on rolled out dough and help them gently press their hand and fingers into the dough. Gently raise hand. Use a sharp knife to cut handprint our of dough. It helps in removing the cutout dough if you fold the fingers back onto the hand part. You may need to use the tip of your knife to carefully help picking the dough up.

After the handprint is removed fill the area left with clear pony beads. We used round ones and also long ones and a few square shapes. Make sure you make a hole in the top so you can thread some string to hang your suncatcher with. Place on a cookie sheet and bake at 375 degrees for 1.5 to 2 hours. Turn off the oven and let suncatchers cool slowly in the oven so they don't crack when they are removed from the oven. Suncatchers and ornaments will turn brown when baked so don't be alarmed. You can cover the brown color with paint or glitter. 

To make the ornaments you use the same dough and instructions, just use cookie cutters to cut the ornaments out. It does seem to help the dough not stick to the wax paper if you add a little bit of flour to the surface of the wax paper. I also had to add a bit of extra flour to the dough because it was too sticky. I added just enough so they weren't sticky when I kneaded the dough and it didn't stick to my hands.

           Have fun and enjoy making these with your little ones. Or older ones too! 


Our salt dough Christmas craft creations!


Friday, December 6, 2013

More Than "Mere" EDUCATION GIVEAWAY

  I am so excited to share with you the More Than "Mere" EDUCATION GIVEAWAY. This is a  super, fantastic give-away. I am so pumped to see who wins. There will be two winners and each will win a fabulous prize package. This is just in time to go hand in hand with the Mere Christianity Critical Analysis Journal that will be coming out in January. I will be doing a review the first week in January to let you know what I think and how our family used it. Hurry and enter for your chance to win a prize package containing this wonderful resource in either printed form or as a download!


http://www.homeschooladventure.com/affiliate/idevaffiliate.php?id=1047


The Home School Adventure Co. Launch Team is excited to help celebrate the release of the Mere Christianity Critical Analysis Journal with a special giveaway filled with books that will compliment your classical studies, as well as a couple of special surprises.  


The best news is that there will be two winners, each receiving a very valuable prize package!  


We would like to thank the following friends for their generous sponsorship of this giveaway! Be sure to stop by their websites to say thank you!


Institute for Excellence in Writing
Nancy Pearcey
Trivium Pursuit
Bright Ideas Press
Raising Real Men

Here are the prize packages you could win! 


Prize Package #1

Our first prize package contains all of the print resources from Home School Adventure Co., as well as wonderful books, curriculum, and even a marriage retreat. This prize package, sponsored by the Institute for Excellence in Writing, Nancy Pearcey, and Trivium Pursuit, has a value of $500!

Mere Christianity Critical Analysis Journal $28.95
Philosophy Adventure - Pre-Socratics Complete Set $89.95
Philippians in 28 Weeks ESV $28.95
The Wise Woman with Literaray Analysis Journal Questions $28.95

IEW Teaching Writing/Student Writing Value Pack (Winner's Choice of Levels A, B, or C) $249

The Soul of Science $11.99
Total Truth $25.00
Saving Leonardo $26.99

Teaching the Trivium Christian Homeschooling in a Classical Style $20.40
The Fallacy Detective $22
The Thinking Toolbox $22


Prize Package #2

Our second prize package is filled with all of the resources offered at Home School Adventure Co. in their downloadable editions, as well as a set of all 3 volumes of The Mystery of History by Linda Hobar. This prize package, sponsored by Bright Ideas Press and Raising Real Men, has a value of $300! 

Mere Christianity Critical Analysis Journal Download $18.95
Philosophy Adventure - Pre-Socratics Digital Download $39.95
Philippians in 28 Weeks ESV Download $14.95
The Wise Woman with Literary Analysis Journal Questions Download $14.95

The Mystery of History, Volume I $49.95
The Mystery of History Volume II $49.95
The Mystery of History Volume III $59.95

My Beloved and My Friend book and Marriage Retreat Online $45
Pollyanna Audio Book Download $18

To enter, use the Rafflecopter below. Residents of the U.S., age 18 and older please.


a Rafflecopter giveaway


Thursday, December 5, 2013

Forgiveness. Are You Resisting?

A few years ago something just wasn't right with me. I had this continual niggling in the back of my mind that I needed to do something, but I was obstinate, refusing to acknowledge what was wrong. I finally started studying  my Bible. I gravitated toward the verses to do with parenting and the responsibilities of parents toward their children. I tell you as I read I was heartbroken and I realized what I needed to do. But I was defiant and fought doing what I knew was right and of course satan whispered in my ear all the things that fed my fear.

Things like, don't ask for forgiveness, they'll think you're weak. Don't admit you were wrong they'll use it against you. Don't seek reconciliation, why should you be the one to always step forward first. You've been wronged too. On and on it went with me opposing taking action. Eventually I could withstand it no longer and I sat down and wrote a letter from the deepest, scariest, most unseen depths of my heart asking for forgiveness. Asking for something that laid me bare, but I trusted God to give me the words to say. Then I waited.

I knew I was asking something that until you have to put it into practice and are asked to forgive is easy. I had to trust that God knew best and that with his guidance I had used the right words so the initiation of healing could begin. For days I heard nothing and so I finally sent an email. In the next few emails the tone of the one I asked forgiveness of was wary. I could sense how my asking forgiveness had uncovered old wounds and at first  I was met with inflexibility because of old hurts. But as we talked I could see those old hurts melt away and forgiveness begin. I wish I could say we lived happily ever after, but life isn't a fairytale.I finally gave is and quit resisting and the fears I had turned out to be lies. Nothing I feared came to pass.

God had prompted me to do what I should have done years earlier, but I had resisted. I had foolishly torn down the walls of my house with my own hands instead of building them up. I had hampered and hindered relationships because I resisted giving up control. Don't be fooled by thinking a poor relationship doesn't have far reaching consequences. It can reach past the present relationship far into the next generations.

My bit of advice from the perspective of my experience is never let the sun go down on your anger. Make amends immediately after a disagreement, ask for forgiveness if you have wronged another and don't be so concerned with who is right.


Wednesday, December 4, 2013

So You Think You Are Creative? Sandwich Inventions Our Family's Style

My children take after me. We are a breed apart. Sort of a combination redneck/hillbilly/countrified/downhome/common/hicks from the sticks, peeps. To prove it my oldest son, when they were getting ready to leave on Thanksgiving, said he wanted to take some mashed potatoes home. Ya know why? Because he wanted to make some mashed potato sandwiches! LOL

My kids also love my specialty, mayo, cheese and onion sandwiches. It was my invention when I was thirteen and now my kids eat them too! Fried potato sandwiches? We've ate em! Tomato sandwiches? We've ate those too. PB and banana sandwiches? Oh do we love those! They are scrumdilly-icious!

Now the torch is being passed on to one of my younger kids. McKenna just brought me a pork-n-bean and cheese sandwich! HA, HA, HA, HA, HA! Yes, I am eating it and it's pretty darn good!

Oh, and for what it's worth, I once saw in a gourmet magazine recipes for tomato sandwiches! I also saw one for MY onion and cheese sandwiches! SEE?! They are so good my idea was copied! Bwahahahahaha

If eats like these make us redneck/hillbilly/countrified/downhome/common/hicks from the sticks peeps, then so be it. I count it as a badge of honor and I am proud of it!

Tuesday, December 3, 2013

What Was It LIke In That Stable?

Well it's happened once again. Another year has passed and we are once again decorating for Christmas. We are taking the month of December off from school and concentrating on family. Reading lots of books, baking cookies, doing crafts, looking at the pretty lights, but most of all remembering why we celebrate. Remembering the Hope we have and telling the girls the story of the babe born in a stable long ago. A child who was born to save the world!


Rejoice! Doesn't that word fill you with joy and hope, anticipation and excitement? Rejoice! This time of year is a time of remembering and celebrating our saviors birth. Giving Jesus the honored place. I've often wondered about what it was like in that stable all those years ago. Was it quiet and hushed, and warm with the moist breath of all the animals? Was his bed of straw nice and snuggly and his swaddling clothes warm? Did Mary bring forth her first born son with ease, only needing Josephs hand to hang onto? What was it like in that stable?

I tend to think my warm fuzzy imaginings make it easier for me to paint a wonderful picture of a Holy, Silent Night. Not to mention are probably not close to what actually happened. I have attended enough births to know babies aren't born without laboring and pain and deep gutteral  cries. I also grew up on a farm and I know a stable isn't always the cleanest, warmest, nicest place. It certainly wouldn't be first choice for giving birth for any mothers I know. Was Mary, wanting her midwife? Did she hope for a soft bed for her son? Maybe, but I bet above all else she was thankful for what she had. She had willingly became God's handmaid and trusted him to provide what she needed. What an honor to be the mother of the savior, and to be the first to look into the eyes of God!

Rejoice for we have hope! Sometimes at night I go outside and look up at the inky black night sky. I gaze at the stars hung in the heavens and marvel that God hung them there. I ponder that so many times throughout the ages he has used signs in the heavens to announce something BIG! He announced something monumental was about to take place in the heavens before the birth of Christ. Angels announced the birth of a savior to shepherds tending their flocks on the surrounding hills. The Magi studied and observed and trusted and sought out the King. They traveled from afar for a long while and brought gifts. Those gifts would be presented eventually and needed and put to use in time. There was a purpose. Yes, God knew what would be needed and he provided. Our Lord's birth may have been a stable, but that stable served a purpose of heavenly design. The attendants may have been lowly animals, but they were animals honored to be present for the first Christmas. What was it like in that stable? I think it was just as God intended.


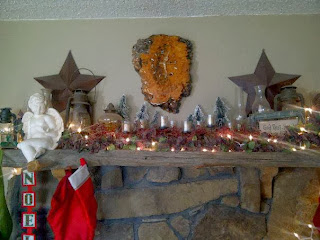
We joyfully head into the season and want to share some pictures of the girls decorating the house as we remember the true meaning for the season and why we celebrate. May this season find you well and may your needs be met. Many blessings to you and yours!


Lights on the mantel


My nativity I have had for years. I love each chipped piece.


Putting the angel on the tree top with big sisters help.

A helping hand is always a good thing especially when it is your sister!

Mere Christianity Critical Analysis Journal 15% OFF SALE!

Here's your chance to pre-order the MERE CHRISTIANITY CRITICAL ANALYSIS JOURNAL, for 15% off! Pre-order this terrific resource from HomeSchoolAdventure.com  now and save. It's full of thought provoking and engaging questions. We are using it as a family right now and will give our review in January. It's a terrific resource to use and it's making our evenings quite full of discussion. Much more fun for us than watching tv.


http://www.homeschooladventure.com/affiliate/idevaffiliate.php?id=1047


Monday, December 2, 2013

Cyber Monday Sale Home School Adventure Co.

Home School Advdenture Co. is have a 20% off sale for Cyber Monday. Check it out! Use code WE-LOVE-YOU-20.

http://www.homeschooladventure.com/affiliate/idevaffiliate.php?id=1047


When You Feel Out Of Your Element

Ever feel like you are out of your element? Or that you have gotten out of your comfort zone? I know I have. Many times when that has happened to me I have the strongest inclination to hurry back to my comfort zone where I feel safe. Where I don't have to do the hard things.  But you know what? Every time I have gotten out of my comfort zone or felt out of my element, but made the choice to do what needed to be done I've grown. I've also been blessed.

Maybe not immediately, but just when I needed it and at the right time. You may feel like an egg that's expected to fly, but be assured God knows what you have need of. If you indeed are an egg that is expected to fly then He will see to it you are prepared. Life has sometimes occurred for me in dramatic episodes. There have been things I have experienced and later because of those experiences been privileged to help another hurting soul.

Sometimes the things I said I was sure were no help at all. Until later. Later when those individuals came to me, and said how much what I shared helped or how it helped them see through the haze of grief, helped me see the worth of getting outside my comfort zone. Those times helped me see that God's ways are higher than my ways and His thoughts higher than mine.


http://www.homeschooladventure.com/affiliate/idevaffiliate.php?id=1047


Sunday, December 1, 2013

Christmas Crafts 4 Kids Galore And December Giveaways on TNB

Hurry Teachersnotebook is giving away a bunch of super prizes. The first of which will end tonight.  Check out all the awesome giveaways and Freebies here. Lots of things to be found from PreK to 8th grade and a few beyond.

A few more Christmas things you may be interested in are Christmas crafts.

 CHRISTMAS CRAFTS GALORE!

Printable Letter To Santa 

Make A Cardboard Christmas Tree 

Lego Wall Letter

Make A Cardboard Gingerbread House

Build Your Own Snowman Printable

Popcicle Stick Sleigh Ornament

Tape Dispenser Sleigh

Gingerbreadman Toilet Paper Roll Craft

Dancing Santa

Star Garland


FOR THE BIRDS

Orange Peel Bird Feeder

Feast For The Birds Feeder


HANDPRINTS, FOOTPRINTS

Redbird Handprint

Handprint/Footprint Angel

Christ In The Manger Footprint

Handprint Reindeer


TREES

  Names Of God Tree

Flowerpot Tree

Twig Trees

STARS  AND SNOWFLAKES

 Primitive Star

Clothespin Snowflakes

Jewel Stars

Snowflake Jar

Plastic Icicle


You can find these and many, many more crafts on my Christmas Crafts 4 Kids Pinterest board found here.  Hope this blesses you and your kiddos this holiday season and Happy Crafting!